오늘의 짧은 순간
오랜만에 학교에 일이 있어서 걷고 있는데 눈 덮힌 숲속이 보였습니다. 익숙하면서 낯설은, 그리우면서 반갑지 않은, 많은 생각와 그림이 떠오르면서 가슴에서 형언할 수 없는 느낌을 받았습니다. 저는 이 느낌을 표현할 수 없었고, 최대한 글로 남기기 위해서 노력했습니다. '가슴이 간지럽다' 이 문장으로 모든 것을 표현할 수 없지만 일부라도 담을 수 있을 것 같습니다.
YOLO 학습 방법 개요
1. 전처리 : YOLO_mark로 이미지에 bounding box를 그리면, bounding box 정보가 저장된 txt 파일이 생성됩니다.
2. 학습 : 이미지와 txt 파일을 darknet에 넣고 학습합니다.
YOLO_mark 설치
opencv가 필요합니다. https://opencv.org/releases/에서 다운로드 해줍니다. 저는 3.x버전을 사용했습니다.
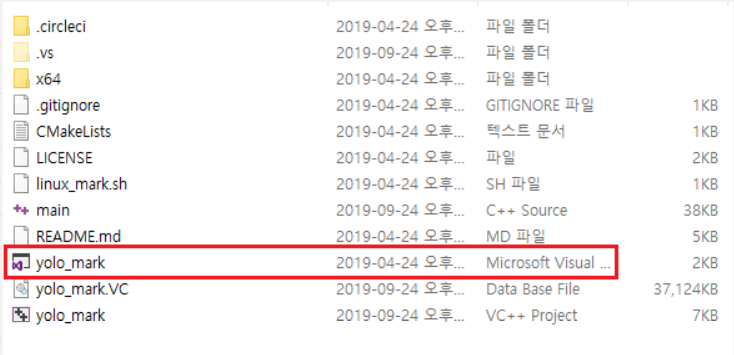
이제 YOLO_mark를 다운로드해야 합니다. https://github.com/AlexeyAB/Yolo_mark.git를 다운로드 받습니다. 파일 열어서 yolo_mark.sln를 실행시킵니다.
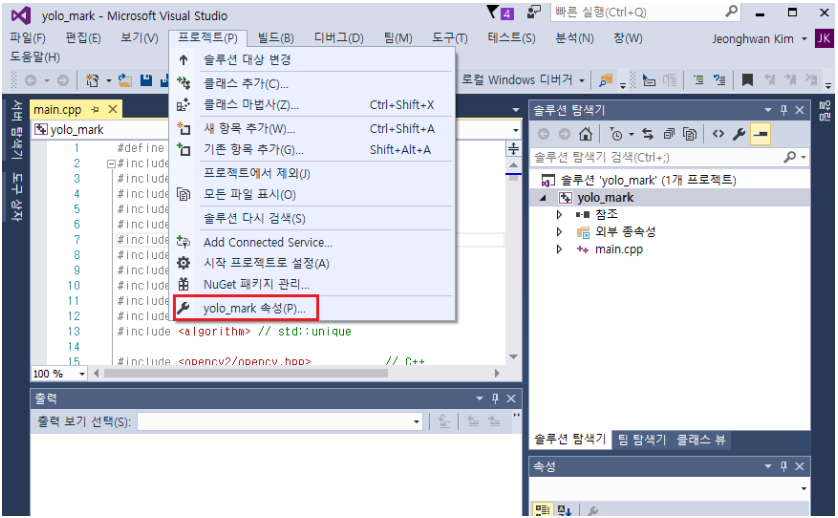
설치한 opencv의 경로를 yolo_mark가 사용할 수 있도록 설정해 주어야 합니다. 프로젝트를 눌러서 속성으로 가줍니다.
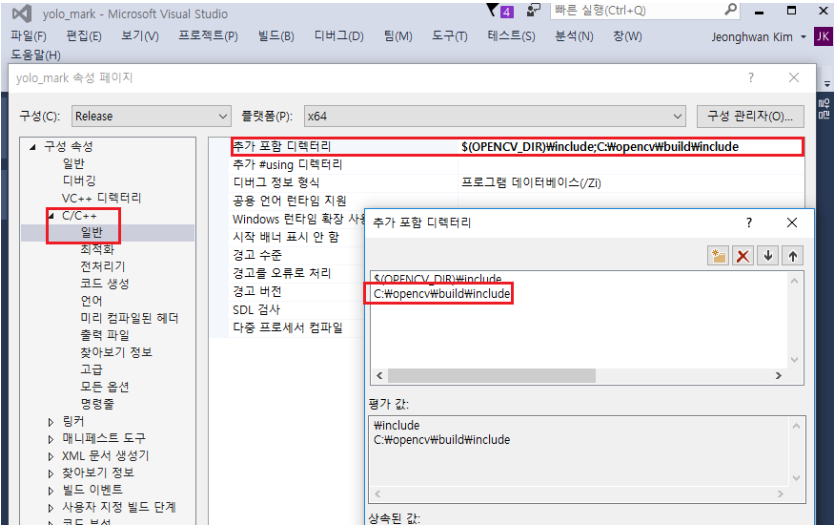
'C/C++'의 '일반'에 가서 '추가 포함 디렉터리'에 C:\opencv\build\include를 추가해 줍니다.
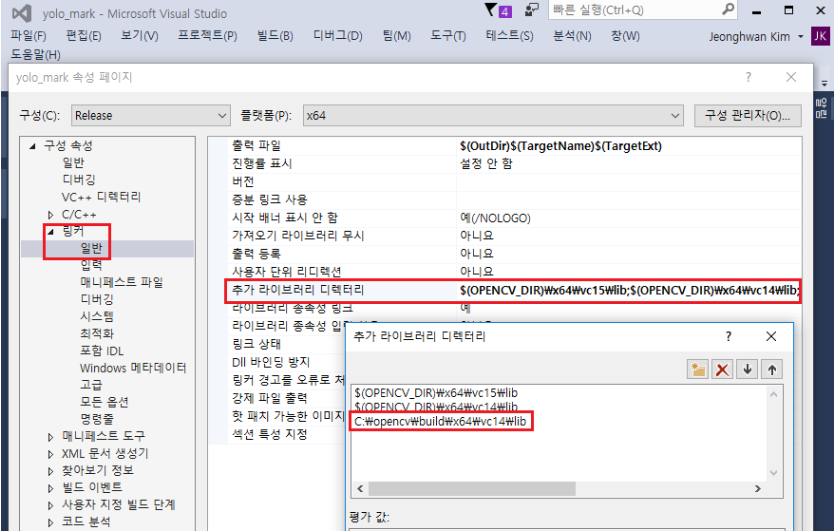
이번에는 '링커'의 '일반'으로 가서 '추가 라이브러리 디렉터리'에 C:\opencv\build\64X\vc14\lib를 추가해 줍니다.
마지막으로 'release'와 'x64'로 설정하고 compile합니다.

Compile이 성공하면 Yolo_mark/x64/release에 갑니다. yolo_mark.exe 파일이 생성되어 있을 것입니다. 그러면 yolo_mark.cmd를 실행시킵니다. 아래와 같은 화면이 나오면서 YOLO_mark 설치에 성공하셨습니다.

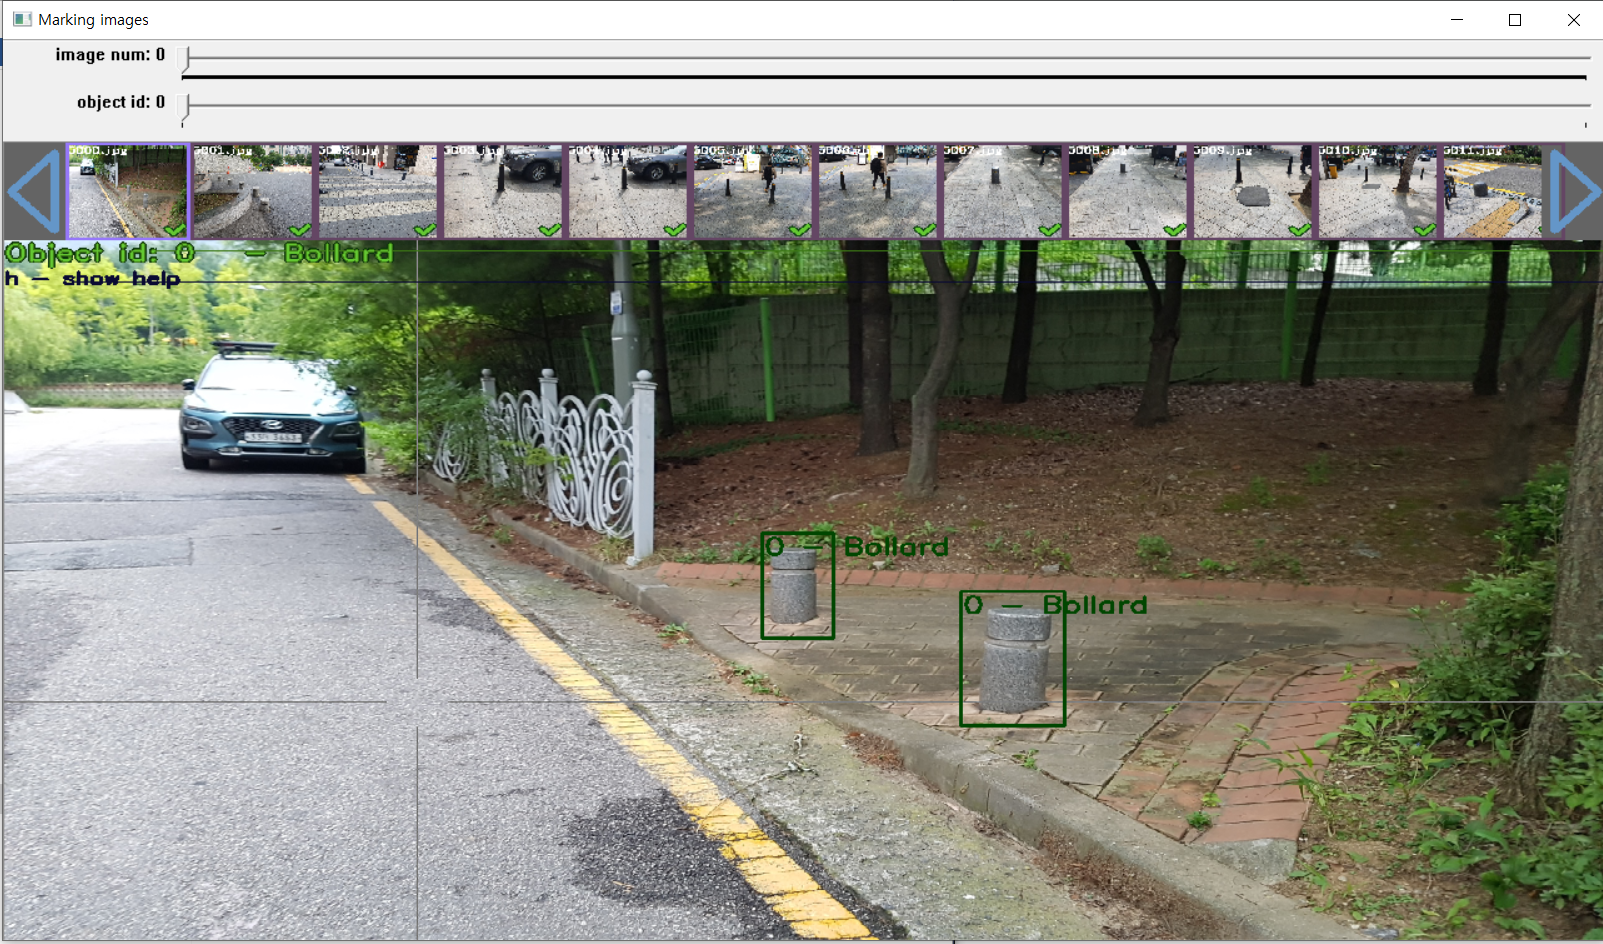
실행하면 아래와 같은 프로그램 화면이 나오면서 bounding box를 그릴 수 있습니다.
전처리
이제 전처리를 하셔야 합니다. yolo_mark.cmd를 꺼주시고 Yolo_mark/x64/Release/data로 가서 obj.data을 열어주세요.
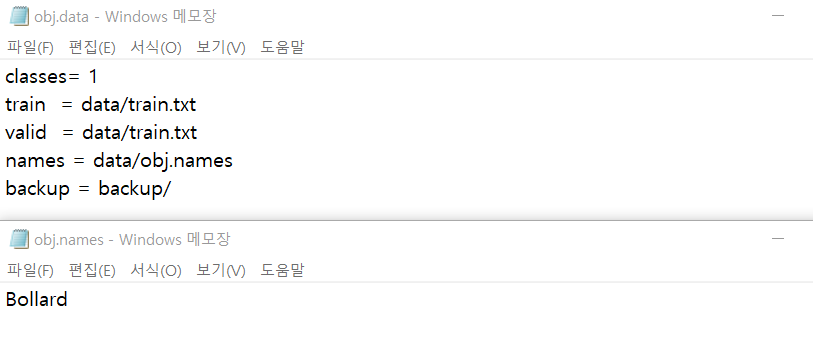
분류하고 싶은 class의 갯수를 classes에 입력합니다. (저는 bollard 1개만 분류하고 싶어서 classes=1입니다.)
obj.names을 열어주세요. 그리고 분류하고 싶은 class의 이름들을 세로로 적어주세요. (저는 Bollard만 적었습니다.)
Yolo_mark/x64/Release/data/img로 가서 기존에 있던 이미지들을 모두 삭제합니다. 분류하고 싶은 이미들을 넣어주세요. 참고로 JPG만 가능합니다. PNG는 학습 중에 오류가 뜹니다. 그리고 JPEG는 무시됩니다.
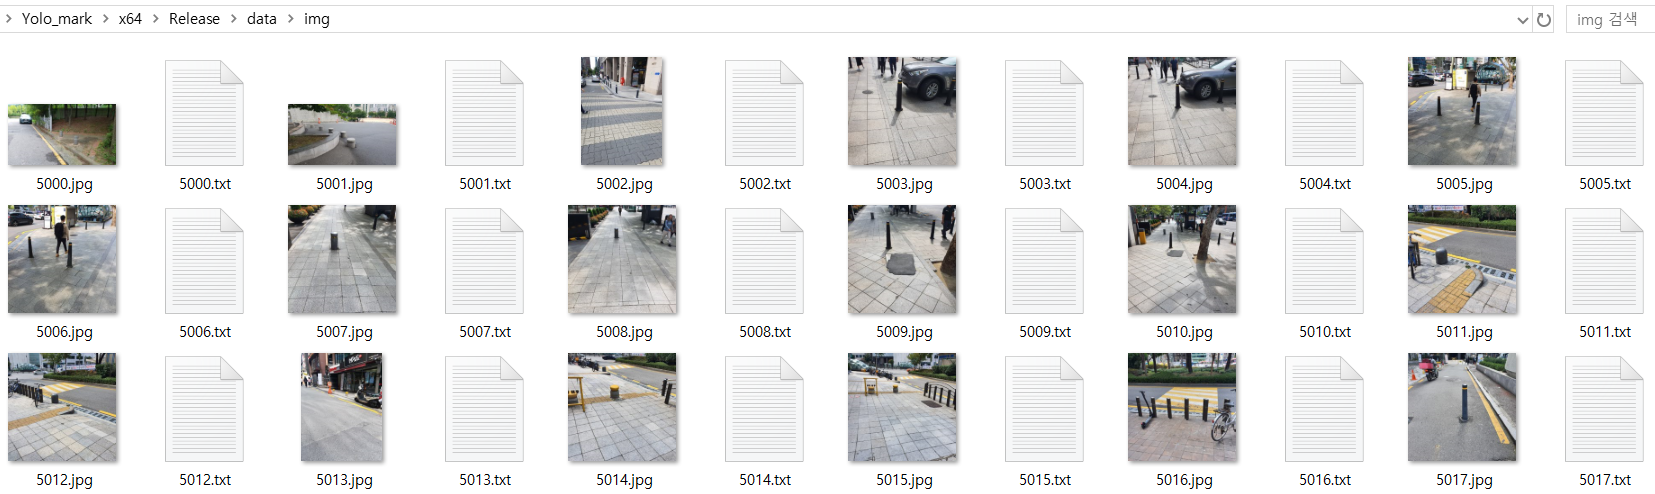
다시 yolo_mark.cmd를 실행해 주세요. 그리고 마우스로 한땀 한땀 bounding box를 그려넣어줍니다. 여러 단축키가 궁금하다면 단축키는 'h'를 누르면 나타납니다. 하나씩 넘길 때마다 위에서 봤던 것과 같이 txt파일 이미지 옆에 자동 생성됩니다.
TXT의 내용은 <object-class> <x_center> <y_center> <width> <height> 입니다.
YOLO 학습시키기
본격적으로 YOLO 학습을 진행하겠습니다. 필요한 준비물들을 챙기도록 하겠습니다. 가장 먼저 학습시킬 프로그램을 다운로드 해야 합니다. https://github.com/AlexeyAB/darknet#how-to-train-to-detect-your-custom-objects에서 darknet을 다운로드 합니다. 어떤 버전으로 학습시킬 지 선택해야 합니다. 위 링크에서 YOLO_V2와 YOLO_V3, Tiny_YOLO를 학습시킬 수 있습니다. 저는 셋 다 해봤지만 여기에서는 YOLO_V3로 글을 작성하겠습니다.
darknet을 다운받았다면 compile을 해주어야 합니다. https://github.com/AlexeyAB/darknet/#how-to-compile-on-windows-legacy-way 에 설명되어 있습니다. 추가로 [https://studyingcoder.blogspot.com/2019/04/open-source-yolo-v3.html]의 도움을 받았습니다. (compile하는데 굉장히 고생했습니다. 무슨 오류가 그리도 많이 나타나던지...)
빌드: Legacy way
일반적인 방법을 먼저 알려드리겠습니다. 가장 먼저 Visual studio 2015, CUDA 10.0, OpenCV 3.X 그리고 cuDNN 7.4이 필요합니다.
CUDA 10.0: https://developer.nvidia.com/cuda-downloads
OpenCV 3.X : https://opencv.org/releases/
cuDNN 7.4 : https://developer.nvidia.com/cuda-downloads?target_os=Windows&target_arch=x86_64
(CUDA는 Visual Studio가 설치된 이후에 무조건 설치되어야 합니다.)
(cuDNN은 뉴런 네트워크의 속도를 올려줍니다. cuDNN은 CUDA와 호환되는 버전을 다운 받으세요)
다운받아서 적절한 곳에 모아두세요. 그리고 유저 환경 변수 말고, 시스템 환경변수에 경로에 cuDNN과 OpenCv, CUDA의 위치가 있는지 확인해 주세요. 없으면 추가해 주세요. 이 분의 블로그를 참조했습니다.
build/darknet/darknet.sln을 실행합니다. 간혹 실행이 되지 않는 경우가 있습니다. Visual studio 버전이 맞지 않아서 그렇습니다. Visual studio 2015로 바꾸어도 안되는 경우가 있습니다. 그럴 경우 darknet.vcxproj 파일을 메모장으로 개봉합니다. 그리고 cuda, ToolsVersion(본인 visual studio의 속성 -> 일반에서 확인할 수 있습니다.)의 버전이 설치한 버전과 맞는지 확인하시면 됩니다. 다시, build/darknet/darknet.sln을 실행이 되면, 아래와 같이 x64와 Release로 설정합니다.

이제 Build를 해줍니다. 그러면 darknet.exe가 생성됩니다.
[문제 해결]
*.dll 파일이 없다는 오류 메시지가 나타날 수 있습니다. 이것은 yolo_mark 파일에 *.dll 파일이 없어서 그렇습니다. 메시지를 보니 opencv의 dll 파일이 없는 것 같습니다. opencv 폴더에서 찾아서 darknet.sln가 있는 폴더에 복사해 넣습니다. 그리고 다시 빌드합니다.

그외에 cuDNN없이, GPU없이, OpenCV 2.x, 상태에서 빌드업하는 방법이 있습니다. https://github.com/AlexeyAB/darknet/#how-to-compile-on-windows-legacy-way 이 링크를 참조해주세요.
빌드: Custom
(안 하셔도 됩니다.)
지금까지 일반적인 빌드업 과정이었습니다. 그런데 필요에 따라 다른 CUDA버전, 다른 OpenCV 버전을 가지고 빌드업 하고 싶습니다. 그 방법에 대해서 설명하겠습니다. 빌드업 방법을 조사했을 때, 인터넷에는 custom 설치가 많았습니다. 어쩌다 보니 저도 custom으로 했습니다. 개고생. 지금 소개할 방법은 project를 새로 만들어서 하는 방법입니다. CUDA 9.1과 OpenCV 3.0으로 진행합니다.
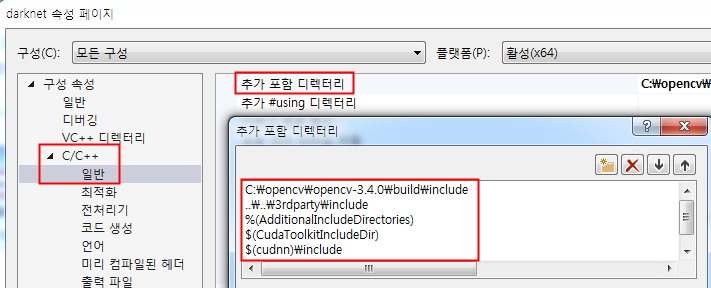
설치한 CUDA와 OpenCV, cuDNN의 경로를 설정해 줄 것입니다. 속성 -> C/C++에 일반에 추가 포함 디렉터리에 아래와 같이 경로가 있으면 됩니다.
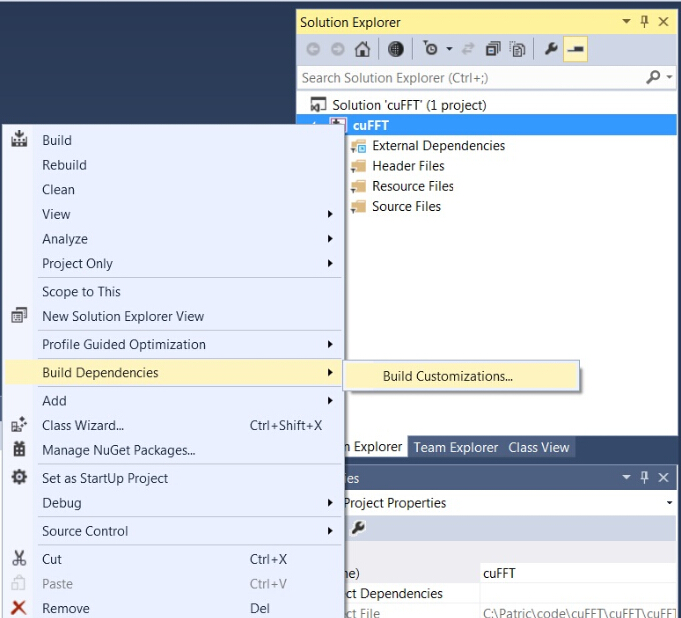
프로젝트 -> Build dependecies -> Build Customizations -> 가지고 있는 CUDA 버전으로 맞춥니다.
darknet에 있는 모든 .c 파일들과 .cu 파일들 그리고 /src에 있는 http_stream.cpp, /include에 있는 darknet.h를 생성한 프로젝트에 추가합니다.
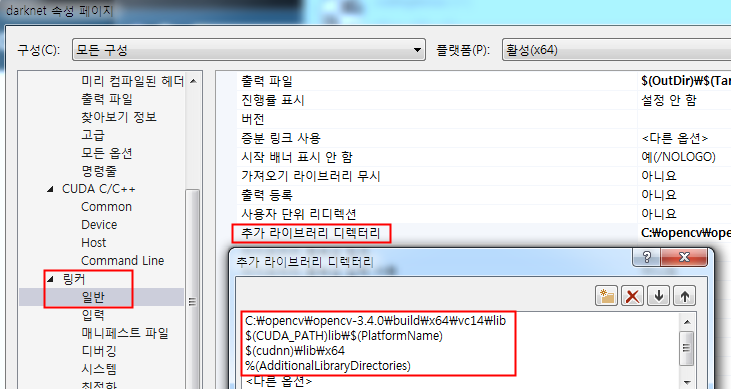
프로젝트 -> 속성 -> 링커 -> 일반 -> 추가 라이브러리 디렉터리에 아래 경로를 추가해 줍니다.
프로젝트 -> 링커 -> 입력 -> 추가 의존에 아래 경로를 추가해 줍니다.
..\..\3rdparty\lib\x64\pthreadVC2.lib;
cublas.lib;
curand.lib;
cudart.lib;
cudnn.lib;
%(AdditionalDependencies)
프로젝트 -> 속성 -> C/C++ -> 전처리기 -> 전처리기 정의에 아래 경로를 추가해 줍니다.
OPENCV;
_TIMESPEC_DEFINED;
_CRT_SECURE_NO_WARNINGS;
_CRT_RAND_S;
WIN32;
NDEBUG;
_CONSOLE;
_LIB;%(PreprocessorDefinitions)
자 그러면 x64와 Release로 설정하고 빌드해줍니다. 그리고 다양한 .dll 파일들을 darknet.exe가 있는 폴더에 추가해 주어야 합니다.
- \3rdparty\dll\x64에서 pthreadVC2.dll, pthreadGC2.dll
- C:\Program Files\NVIDIA GPU Computing Toolkit\CUDA\v9.1\bin에서 cusolver64_91.dll, curand64_91.dll, cudart64_91.dll, cublas64_91.dll
이렇게 하지면 custom 빌드업도 완료가 됩니다. 그외에 일어나는 오류는 스스로 검색해서 찾으셔야 합니다. 제가 오류를 해결하기 위해 참고했던 사이트들을 아래에 나열하겠습니다.
https://studyingcoder.blogspot.com/2019/04/open-source-yolo-v3.html
빌드 이후
신경망 구조를 설정해야 합니다. darknet/build/darknet/x64/cfg로 가면 yolov3.cfg가 있습니다. 이 파일은 복사해서 이름을 yolo-obj.cfg로 바꿔줍니다. 그리고 이 파일을 엽니다. 이제 바꿔야 할 라인을 설명하겠습니다.
- batch = 64 (기본값일 것입니다.)
- subdivitions = 16
- max_batches = classes * 2000 (저는 class가 한 개라서 max_batches = 2000으로 했습니다.)
- steps = max_batches*0.8, max_batches*0.9 (저는 1600, 1800을 사용했습니다.)
- width = height = 416
- [yolo]라는 층이 3개 있습니다. classes = 클래스 개수
- [yolo]층 바로 이전 convolutional 층입니다. filters = (클래스 개수 * 5) * 3 (저는 filters = 18로 했습니다.)
- 그외 더 알고 싶으시면 https://github.com/AlexeyAB/darknet#how-to-train-to-detect-your-custom-objects에 'How to train (to detect your custom objects):' 섹션에 가시면 확인할 수 있습니다.
학습을 위해서 정보가 저장된 파일몇 가지 파일들을 옮기겠습니다.
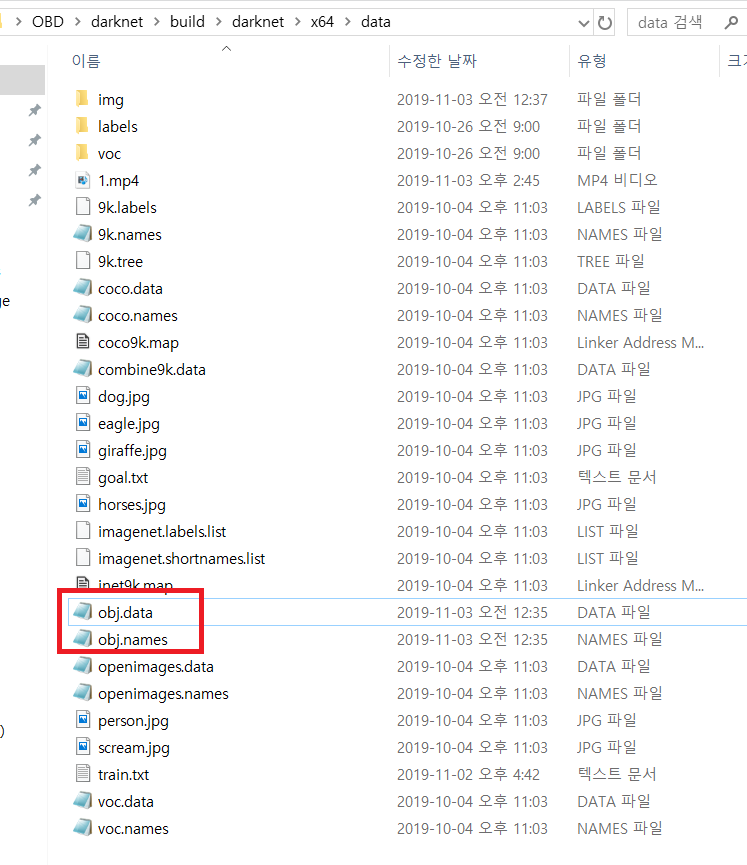
Yolo_mark/x64/Release/data/에 있는 obj.names와 obj.data파일을 darknet/build/darknet/x64/data/로 옮겨줍니다.
Yolo_mark/x64/Release/data/에 있는 train.txt를 darknet/build/darknet/x64/data/로 옮깁니다.
Yolo_mark/x64/Release/data/img/에 있는 이미지 파일들과 TXT파일들 모두를 darknet/build/darknet/x64/data/img/로 복사합니다.
pre-trained weights를 다운로드 해줍니다. https://pjreddie.com/media/files/darknet53.conv.74를 다운로드 해서 build/darknet/x64에 놓아줍니다.
이제 학습 시키겠습니다. CMD을 켭니다. darknet/build/darknet/x64로 이동합니다.
darknet.exe detector train data/obj.data yolo-obj.cfg darknet53.conv.74 를 입력하면 학습이 시작됩니다.
(Linux에서는 ./darknet detector train data/obj.data yolo-obj.cfg darknet53.conv.74 를 입력하면 됩니다. 하지만 저는 Windows에서 Linux처럼 입력을 해야 시작되었습니다.)
학습이 진행되면, darknet/build/darknet/x64/backup/에 yolo-obj_last.weights가 100 iterations 마다, yolo-obj_xxxx.weights가 1000 iterations마다 저장될 것입니다. 학습이 완료되면, yolo-obj_final.weights를 사용하시면 됩니다. 만일, 학습 중간에 멈추고 나중에 다시 학습하고 싶을 때, cmd에 darknet.exe detector train data/obj.data yolo-obj.cfg backup\yolo-obj_xxx.weights를 입력하시면 됩니다. yolo-obj_xxx.weights에 시작 iterations를 입력하면 됩니다.
저는 볼라드 이미지 약 6000장을 학습에 사용했습니다. 총 학습 시간은 GTX 1070 Ti기준 약 30시간 이었습니다.
이 기술을 사용해서 볼라드를 감지하는 어플을 만들었습니다. 학습되어서 나온 yolo-obj_final.weight를 yolo-obj_final.pb 로 변환해서 앱에 tensorflow lite에 탑재했습니다. 그런데 YOLO_V2나 V3는 weights가 크게 나와서 어플이 굉장히 무거워 집니다. 그래서 Tiny_YOLO를 사용했습니다. 어플로 만드는 방법은 여기서 확인하실 수 있습니다.
English
Today's short moment
It's been a long time since I went to Uni. And i saw snow covered forest. Familiar and unfamilar, nostalgic and unwelcome thoughts and pictures came to me, and I felt an indescrible feeling in my heart. I couldn't express this feeling, but I tired to write as much as possible. 'my heart tickles'. I can't express everthing with this phrase, but I think I can contain some of it.
I will explain how to train YOLO. The first thing to do is preprocessing. YOLO should learn image with bounding box instead of learning by normal image as it is. Therefore, the required program is YOLO_mark. After drawing a bounding box on the image by using YOLO_mark, the center coordinates, width, and width of bounding box are saved in a TXT file.
YOLO_mark Installation
we need opencv. download here: https://opencv.org/releases/. I used 3.x version.
Now, we download YOLO_mark here: https://github.com/AlexeyAB/Yolo_mark.git. Open folder and execute yolo_mark.sln.
YOLO_mark needs opencv path to use. Go to 'project' above and click properties.
Go to 'C/C++' and 'general'. Add 'C:\opencv\build\includ' at 'Additional include directories'.
Go to 'Linker' and 'general'. Add 'C:\opencv\build\64X\vc14\lib' at 'Additional include directories'.
Finally, set 'release' and 'x64'. And compile.
If you success to compile, go to Yolo_mark/x64/release. There is created yolo_mark.exe. Execute yolo_mark.cmd and you will see sort of image below. Congrats!
Preprocessing
Now, let's preceed to preprocessing. Exit yolo_mark.cmd, go to Yolo_mark/x64/Release/data and open obj.data. rewrite classes number that you want to classify (I write 1 for Bollard, classes = 1). Next, open obj.names and rewrite class names vertically(I write 'Bollard').
Go to Yolo_mark/x64/Release/data/img and remove all images. Move images that you want to classify. But only JPG is available. PNG will stop YOLO train process. JPEG will be ignored duing training process. TXT file will be made next to image
Execute yolo_mark.cmd again. And draw bounding box around object. If you press 'H' key help menu will pop up. The content of TXT shows <object-class> <x_center> <y_center> <width> <height>.
YOLO Train
Let's head to YOLO Train. Most of all, we need to prepare some files. Download darknet here: https://github.com/AlexeyAB/darknet#how-to-train-to-detect-your-custom-objects. And, you should choose which version to train. There are YOLO_V3, YOLO_V2 and Tiny_YOLO. I have done all three but I will write about YOLO_V3.
After downloading darknet, we need to compile it to darknet.exe. https://github.com/AlexeyAB/darknet/#how-to-compile-on-windows-legacy-way will help you to compile. Actually, I would nearly copy and past. I think you will face some problem even thought the link explain well how to compile. At that time, you should search the errors on google ;)
Build: Legacy way
It is normal way to compile. You must have Visual Studio 2015, cuDNN 7.4, OpenCV 3.x and CUDA 10.0 (CUDA must be installed only after Visual Studio has been installed)
CUDA 10.0: https://developer.nvidia.com/cuda-downloads
OpenCV 3.X : https://opencv.org/releases/
cuDNN 7.4 : https://developer.nvidia.com/cuda-downloads?target_os=Windows&target_arch=x86_64
(cuDNN boosts neural networs fast. Download cuDNN compatible with CUDA)
Check Window system variable path
Open build/darknet/darknet.sln. It might not open sometimes because of different version of Visual Studio, CUDA. To solve the problem, open darknet.vcxproj on TXT format and check version. For example, cuda=, ToolsVersion=. After through the problem, set x64 and Release. And Build. darknet.exe will be created.
There are things to do.
* Find files opencv_world320.dlland opencv_ffmpeg320_64.dll (or opencv_world340.dll and opencv_ffmpeg340_64.dll) in C:\opencv_3.0\opencv\build\x64\vc14\bin and put it near with darknet.exe
* Check that there are bin and include folders in the C:\Program Files\NVIDIA GPU Computing Toolkit\CUDA\v10.0 if aren't, then copy them to this folder from the path where is CUDA installed
* To install CUDNN (speedup neural network), do the following:
- download and install cuDNN v7.4.1 for CUDA 10.0: https://developer.nvidia.com/rdp/cudnn-archive
- add Windows system variable CUDNN with path to CUDNN: https://user-images.githubusercontent.com/4096485/53249764-019ef880-36ca-11e9-8ffe-d9cf47e7e462.jpg
- copy file cudnn64_7.dll to the folder \build\darknet\x64 near with darknet.exe
If you want to build withoud CUDNN, other version of CUDA, without GPU, other version of OpenCV, go to here: https://github.com/AlexeyAB/darknet/#how-to-compile-on-windows-legacy-wayand check it out, please.
Build: Custom
If you want to build up customized darknet.sln & darknet.vcxproj with other version of CUDA, OpenCV, ..., you can customize. Here, I will introduce with CUDA 9.1 and OpenCV 3.0.
Create new project and we need add path and files to the project.
(right click on project) -> properties -> C/C++ -> General -> Additional Include Directories, put here:
C:\opencv_3.0\opencv\build\include;
..\..\3rdparty\include;
%(AdditionalIncludeDirectories);
$(CudaToolkitIncludeDir);
$(CUDNN)\include
(right click on project) -> Build dependecies -> Build Customizations -> set check on CUDA 9.1 or what version you have
Add all below files from darknet directories to the project.
- all .c files
- all .cu files
- file http_stream.cpp from \src directory
- file darknet.h from \include directory
(right click on project) -> properties -> Linker -> General -> Additional Library Directories, put here:
C:\opencv_3.0\opencv\build\x64\vc14\lib;
$(CUDA_PATH)\lib\$(PlatformName);
$(CUDNN)\lib\x64;
%(AdditionalLibraryDirectories)
(right click on project) -> properties -> Linker -> Input -> Additional dependecies, put here:
..\..\3rdparty\lib\x64\pthreadVC2.lib;
cublas.lib;
curand.lib;
cudart.lib;
cudnn.lib;
%(AdditionalDependencies)
(right click on project) -> properties -> C/C++ -> Preprocessor -> Preprocessor Definitions
OPENCV;
_TIMESPEC_DEFINED;
_CRT_SECURE_NO_WARNINGS;
_CRT_RAND_S;
WIN32;
NDEBUG;
_CONSOLE;
_LIB;%(PreprocessorDefinitions)
Finally, compile to .exe (X64 & Release) and put .dll-s near with .exe
- pthreadVC2.dll, pthreadGC2.dll from \3rdparty\dll\x64
- cusolver64_91.dll, curand64_91.dll, cudart64_91.dll, cublas64_91.dll - 91 for CUDA 9.1 or your version, from C:\Program Files\NVIDIA GPU Computing Toolkit\CUDA\v9.1\bin
If you get through all the way without any problem, you can step on next. Or, search the errors popping up. Hope you solve the problem ;)
After Build
We should set up YOLO layer architecture. Go to darknet/build/darknet/x64/cfg and find yolov3.cfg. Copy this file and rename to yolo-obj.cfg. Then, open it up to edit lines.
- change line batch to batch=64
- change line subdivisions to subdivisions=16
- change line max_batches to (classes*2000 but not less than 4000), f.e. max_batches=6000 if you train for 3 classes (mine is 2000)
- change line steps to 80% and 90% of max_batches, f.e. steps=4800,5400 (mine is 1600, 1800)
- set network size width=416 height=416 or any value multiple of 32: https://github.com/AlexeyAB/darknet/blob/0039fd26786ab5f71d5af725fc18b3f521e7acfd/cfg/yolov3.cfg#L8-L9
- change line classes=80 to your number of objects in each of 3 [yolo]-layers:
- https://github.com/AlexeyAB/darknet/blob/0039fd26786ab5f71d5af725fc18b3f521e7acfd/cfg/yolov3.cfg#L610
- https://github.com/AlexeyAB/darknet/blob/0039fd26786ab5f71d5af725fc18b3f521e7acfd/cfg/yolov3.cfg#L696
- https://github.com/AlexeyAB/darknet/blob/0039fd26786ab5f71d5af725fc18b3f521e7acfd/cfg/yolov3.cfg#L783
- change [filters=255] to filters=(classes + 5)x3 in the 3 [convolutional] before each [yolo] layer (mine is 18)
- https://github.com/AlexeyAB/darknet/blob/0039fd26786ab5f71d5af725fc18b3f521e7acfd/cfg/yolov3.cfg#L603
- https://github.com/AlexeyAB/darknet/blob/0039fd26786ab5f71d5af725fc18b3f521e7acfd/cfg/yolov3.cfg#L689
- https://github.com/AlexeyAB/darknet/blob/0039fd26786ab5f71d5af725fc18b3f521e7acfd/cfg/yolov3.cfg#L776
If you need more infomation, here : https://github.com/AlexeyAB/darknet#how-to-train-to-detect-your-custom-objects
We need some files.
Create file obj.names in the directory darknet/build/darknet/x64/data/, with objects names - each in new line
Create file obj.data in the directroy darknet/build/darknet/x64/data/, such as below
classes= 2
train = data/train.txt
valid = data/test.txt
names = data/obj.names
backup = backup/
Copy all imges(.jpg) and TXT file from Yolo_mark/x64/Release/data/ to darknet/build/darknet/x64/data/img/
Download pre-trained weights for the convolutional layers and put to the directory build/darknet/x64
https://pjreddie.com/media/files/darknet53.conv.74
(If you need other weights, https://github.com/AlexeyAB/darknet/#how-to-train-to-detect-your-custom-objects)
Start training by using the command line: darknet.exe detector train data/obj.data yolo-obj.cfg darknet53.conv.74
To train on Linux use command: ./darknet detector train data/obj.data yolo-obj.cfg darknet53.conv.74
(However, for me, I typed Linux line on windows and worked...)
While processing training, file yolo-obj_last.weights will be saved to the build\darknet\x64\backup\ for each 100 iterations and file yolo-obj_xxxx.weights will be saved to the build\darknet\x64\backup\ for each 1000 iterations. After training is complete, get result yolo-obj_final.weights from path build/darknet/x64/backup/.
After each 100 iterations you can stop and later start training from this point. For example, after 2000 iterations you can stop training, and later just start training using: darknet.exe detector train data/obj.data yolo-obj.cfg backup\yolo-obj_2000.weights
I input 3000 bollard images. It took 30 hours by using GTX 1070Ti.
I used this technique to make application. I converted customized yolo-obj_final.weights to yolo-obj_final.pb, and set it up on tensorflow lite. However, YOLO_V2 and YOLO_V3 were heavy to set up in application (it was over 150MB). So, I used Tiny_YOLO(it was 55.MB). It could be lower performance than YOLO_V2 and V3, but it was enough to detect bollard on the street. I will post the application on the next post!
'AI > YOLO' 카테고리의 다른 글
| YOLO(You-Only-Look-Once) (0) | 2020.02.16 |
|---|